The subject of lighting or illuminating scale models seems to frighten some model builders. The good news is that the knowledge needed to light your model is rather limited, and the skills are not that difficult. A desire to succeed plus a little research on proper materials such as LED sizes, resistors, soldering irons, and solder are really all you need. The intent of this article is help get you started in the right direction.
Some useful items for basic LED lighting preparation:
- A good fine tip soldering iron
- 60/40 Rosin Solder .032 or smaller
- Shrink tube / Electrical tape
- 30 or 20 gauge wire (Black/White for Positive and Negative)
- "Helping Hands" holder to aid in soldering
- Mini-Toggle switch
- 9 Volt battery clip
- Fiber optics in various sizes
- Wire stripper
- 3 mm and 5 mm LEDs with resistors
- Diffusion material

Getting Started
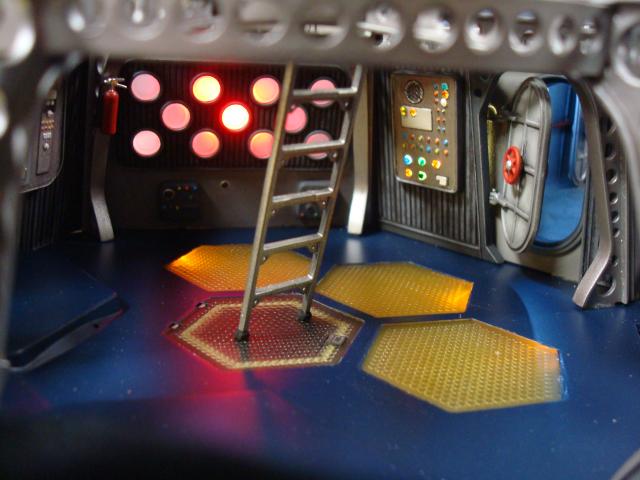
Once you have all your materials on hand, it's time to decide how you want to light your model, and what color LEDs you want. Many choices are available; red, blue, yellow, amber or basic white. For Sci-Fi modeling, illumination is ideal, and getting just the right effect will set your model apart from others. It not only adds to the overall visual effect, but also allows you to see everything inside! Especially in smaller scale models. The cockpit in a 1/72nd scale spacecraft model is extremely small, and would be mostly obscured without lighting. After all that work with detail and perhaps figures, you don't want it to get lost in darkness! Even the tiniest buttons and screens in a cockpit can be illuminated using small LEDs, or better yet, fiber optics running off a single 3 mm or 5 mm LED. Start by soldering whatever size LEDs you decide on, most likely 3 mm with resistors. Pre-make about a half dozen or so LEDs using 20 or 30 gauge wire, finish with shrink tube over the soldered areas, or electrical tape (shrink tube is preferred though) and leave everything long for the time being. You can always shorten the wires later on, once you get everything routed through the model and finalized.
Diffusing Your LED Lights
The one drawback to LEDs is that they tend to be very focused, which is fine, if that's what you're looking for. However, sometimes we are looking for a broad light effect, such as a passenger cabin, flight deck, observation cabins etc. There are several tricks to getting a broadened light effect, one is to set the LED back a bit, and/or add a piece of 1/16th or 1/8th thick piece of diffused clear plastic sheet in front of the LED. You could also take a piece of plain clear plastic sheet, and sand it with some relatively fine sand paper on both sides and create your own diffusion material. However, pre-made diffusion material usually has a textured surface making the light bouncing off the surface more distorted and less focused. Sheets of this material are not very expensive and will last through several projects. Another trick is to bend the diffusion material in a curve, by heating it, and mounting it in the model behind the area you want lit. You can then mount an LED behind the curved material, and get an even more broad light effect. This method really works great!

Preventing Light Leaks
Now that we have our LEDs soldered, and ready to go, and we've decided what areas we want to illuminate, it's time to start mounting the lights in a permanent place and make sure no light leaks go to areas we don't want illuminated. The first thing we want to make sure of is that the light doesn't show through the hull or outer surface of the plastic. Spray the entire inside of the model's hull with a flat black or dark grey primer. You could also use Bare Metal foil, (a great material commonly used in car modeling) on the inside as well. This will deflect the light from showing through the surface or leaking into areas not desired.
Mounting your LEDs in the Model

Plan ahead: try to find the ideal locations for getting the optimum effect. Start by mocking up your pre-soldered LEDs in the areas you want lit, turn everything on, and mark where you want them located. Cut bits of brass or plastic tube with about Œ" inner diameter and about œ" in length and glue in place. The LEDs can slip inside the short tubes and then get glued in place with five minute epoxy or hot glue. After locating, be sure to double check everything, and make sure all the lights turn on before final assembly of the model. There's a point of no return, once you've closed everything up. Occasionally something comes loose, there might be a bad connection and some re-soldering will be in order.
Location of the Battery
Another issue to think about in advance will be the location of the battery. Most LEDs run off a 9 volt battery which needs to be replaced from time to time. You'll want to try and locate it in an inconspicuous place that's not scene, yet accessible, preferably under the base that the model will be displayed on. One way is to route out the wood underneath to fit the battery, and a groove to run the wiring down from the model to the battery and on/off switch. The mini-toggle switch can be located on the model itself, but in an area that's not visible yet accessible.
Although lighting your model may seem a bit daunting the first time, the more you get involved with the electronic aspects, the more it will take on a fascination and challenge of its own. It's also a very useful skill to have when exploring other aspects of modeling like shadow boxes, Sci-Fi figures, dioramas, buildings and model railroading.

About the Author
Lars Liljeblad is a full time modeler who works exclusively for private collectors. His work can be seen on a variety of websites including his own http://larslil.com/ as well as www.scahms.org. His writing credits include work for Fine Scale Modeler and Sci-Fi & Fantasy Modeler.
Lars is currently president of the Southern California area Historical Miniature Society. Striving for excellence in modeling, the club holds a yearly international model competition exhibition which attracts modelers and collectors from around the world.
Lars is a former automotive metal fabricator and his other interests include collecting movie and television memorabilia, as well as history, science fiction, movies and music.
Other Articles On Scale Model Building
Airbrushing Miniatures - Getting Started
Airbrush Painting Tips & Techniques
Preparing a Scale Figure for Painting
Weathering Techniques and Realism for Scale Models
Groundwork and Composition in Scale Modeling
Paint Types for Scale Modelers
Household Items in Scale Modeling