 The airbrush has certainly revolutionized model making. The time-honored tool of the commercial artist has allowed a level of finish quality that most people could not even hope to achieve with a brush. Before the introduction of the airbrush into modeling, there were limitations to getting a near perfect finish. Now, with the tool at its technical peak, flat, perfectly uniform colors for camouflage, and complicated blended colors can easily be produced with some experience and perseverance.
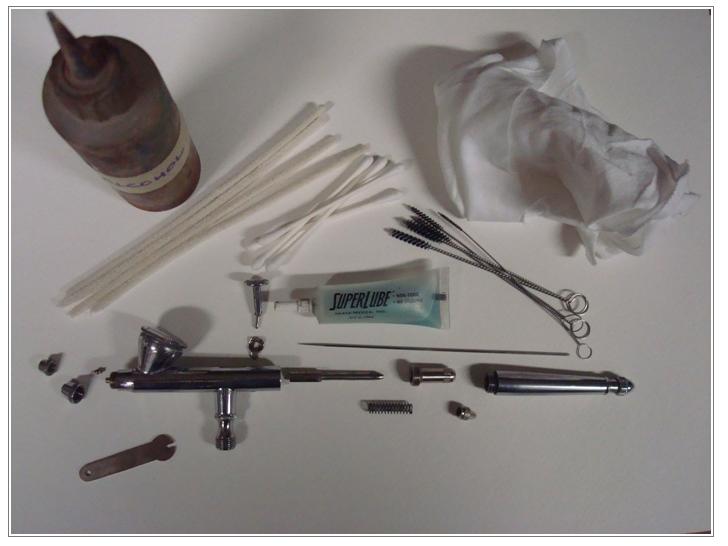
I would like to introduce some tips as well as some techniques that will help the journey to a perfect (or nearly perfect) finish. First, a proper thorough cleaning of the tool is absolutely vital! As seen in the picture, the airbrush has several small precision parts that need to be individually cleaned. Some very essential items to have at hand are some pipe cleaners, cotton swabs, rubbing alcohol (in a squirt bottle), a rag, magnification of some kind, and some lubricant such as SuperLube by Iwata for airbrushes. After cleaning everything, especially the tip, check that the tip is clean by looking at it through some magnification at a light source.
After assembling the airbrush, put a little SuperLube on the needle and the trigger. This lubricant will help you a lot and save much frustration. The trigger area is quite prone to sticking and having it work properly is essential to controlling the volume of paint.
 The airbrush is sometimes blamed for being inconsistent, and that some days it works better than others. There are various reasons it could seem this way, the pigment of the paint used, cleanliness (the most important) and atmosphere. But the user is the main reason its performance seems irregular. Practicing exercises, on a piece of paper is a good way to get warmed up. Try painting lines from narrow to thick, some loops, and then some geometric shapes, dots and such. Also, remember to try different dilutions of paint to obtain the proper thickness. The control of the paint coming out of the tip is the key to getting a desired finish.
The other important thing to remember is that painting on a flat surface is very different from painting on a three dimensional one. Once you understand the basic process, I would advise switching over to an older discarded model to practice on. The other factor is the distance the airbrush is held from the work. Practice on the paper or a spare model to determine the correct dilution of the paint, air-pressure and distance from the work, and then move over to the model at hand. I'd also recommend minor cleaning in between color changes.
I would also like to talk a little bit about colors and mixing. There are only three primary colors (red, yellow and blue) that cannot be made from other colors, and these become the basis for all colors. When adding variations to these primary colors, you get secondary colors: orange by adding yellow to red, green by adding blue to yellow, and dark blue by adding red to blue. It's important to study color value, and to know what colors complement each other. For shading technique, adding black tends to add a grayness and kills the color's intensity. Try adding blue or green to red for example, or violet to yellow. There are many color variations that can be used for shading and highlighting that will retain the original color value. It's a good idea to have an artist's color wheel handy when you first start out mixing. After a while you can experiment and come up with your own formulas.
A good little trick I learned about light and shadow when working on miniatures is to study where you want the light source to come from. I usually prime my models in light grey or white. After which, I set up a lamp at the angle I wish the light source to come from. This will create the shadows and highlights; I then photograph the model under the light and use it as a reference for painting.
 The nice thing about the airbrush is that the paint comes out so subtly and so controlled that you can use the picture as described as reference, then hold the airbrush as though it was the light, the high points on the models will catch the paint, and automatically do some of the highlighting. For the shading, the model is turned upside down and treated much the same way using the above-described photo as reference. I would like to mention that it will be necessary to go back, especially on smaller scale models, and bring out the lights and shadow even further. Airbrushing will get this started, but it won't necessarily be completely finished. A little hand brushing will help emphasize the areas started with the above procedure. On some of the larger scale figures, it is very possible to completely airbrush the skin tones, with no need to go back and bring out anything!
For any model or miniature, whether it is a vehicle or a figure, it is very important to remember not to lose those mid-tones! It is sometimes easy to get carried away with lights, shadows, and weathering and suddenly loose the original mid-tone (or base color) after the piece is nearly finished. If this is the case, it is quite easy fixed with the aid of an airbrush. Simply, load your airbrush reservoir with your original base color, and mist a light coat of paint over the entire surface. This process will tone down the highlighting, and shadows as well as restoring the original color back. You may then want to carefully go back and bring out the highlights, shadows and graduations. This process sometimes takes a few tries. There really is no formula for obtaining a perfect finish, only some tried and true guidelines that will get you pointed in the right direction. After that, it is just a matter of experience and perseverance. Some days are easier than other days. But the key is really to train your eye, and know what to look for on your journey.
In closing, another thing to remember, especially when airbrushing miniature figures or vehicles is that the larger the model, the less exaggerated light and shadow the better. On a smaller figure, for example, exaggeration is necessary because the naked eye simply can't see transitions as well. Even though blown up to 1/1 scale, the painted on highlights and shading would look much too extreme. Again, train your eye for what "looks right" but do not necessarily be literal in your depiction of a true scale model of the life size object you are modeling.
About the Author
Lars Liljeblad is a full time modeler who works exclusively for private collectors. His work can be seen on a variety of websites including his own http://larslil.com/ as well as www.scahms.org. His writing credits include work for Fine Scale Modeler and Sci-Fi & Fantasy Modeler.
Lars is currently president of the Southern California area Historical Miniature Society. Striving for excellence in modeling, the club holds a yearly international model competition exhibition which attracts modelers and collectors from around the world.
Lars is a former automotive metal fabricator and his other interests include collecting movie and television memorabilia, as well as history, science fiction, movies and music.
Other Articles You Might Find Enjoyable
Airbrushing Miniatures - Getting Started
Preparing a Scale Figure for Painting
Weathering Techniques and Realism for Scale Models
Household Items in Scale Modeling
Groundwork and Composition in Scale Modeling
Illuminating Your Scale Model with LEDs & Fiber Optics
Paint Types for Scale Modelers
Getting Ready to Work with Polymer Clay
Polymer Clay Mica Shift: To Slice or Not To Slice
How to Measure Model Rocket Altitude